With so many different sugar wax recipes out there, it’s easy to go wrong and you may find yourself getting frustrated with many failed attempts at getting the sugar wax consistency right. In this post, I’ll show you guys a really simple sugar wax recipe without strips. That’s right! No more cutting out long strips of your old jeans or using those annoying popsicle sticks to sugar wax! This sugar wax recipe was formulated after a few trial and errors so it’s quite perfect in consistency and efficiency, if I must say so myself. I’ve also included a step-by step photo tutorial below so you can see what kind of consistency you should expect.

Now, if you’re new to sugar waxing or body sugaring as it’s also known, then I’ll explain – it’s a form of natural (and ancient as it was practiced in Arabia since long ago) body hair removal method using ingredients that are probably in your kitchen right now. The basic ingredients in the original Arabian wax recipe include sugar, lemon juice and water. I’ve added a little of another ingredient that makes the recipe better for me but of course it’s totally optional.
What makes sugar waxing so different and special you ask? Lemme break it down for you:
Shaving
- Does NOT get hair from the roots (it’s so scratchy and awful when you remain with tiny shaven hairs ugh).
- Weird bumps/rashes form.
- You get unsightly dark spots.
- Razor burn (duh!).
- You have to do it more frequently – some people even do it every day. Ouch.
- Causes ingrown hairs. Read: DIY Sugar Scrub for Ingrown Hair Prevention & Treatment, DIY Ingrown Hair Treatment Spray | Also Prevents & Reduces Ingrown Hair, DIY Ingrown Hair Serum Recipe, Don’t Pluck! Top 5 Essential Oils for Ingrown Hairs
Waxing
- First off, expensive.
- No ingrown hairs and bumps.
- Lasting results since it removes hair from the roots.
- P-A-I-N. It’s a pretty painful process. Scratch that – it’s a viciously painful process.
- It’s sticky.
- Kinda time consuming.
Sugar Waxing
- All natural, to the point that you can eat the sugar wax. If you add the guar gum, then don’t try it O.o
- Cheap. As I said, it uses kitchen ingredients! Don’t miss: Easy Sugar Wax Recipe No Lemon Juice Involved
- Results last longer than shaving (can go up to 6 weeks, hairs grow back thinner and may never go back at all with regular use (SAY WHAT!).
- Ridiculously easy to make (when you follow the instructions to the dot).
- Easy to use especially this recipe without strips (the wax itself is used as a strip). All you gotta do is stretch it over your skin and quickly pull (more on that later).
- Less painful. It’s a quick process and very less painful compared to waxing.
- No bumps, no ingrown hairs, no dark spots.
- The mixture is water-soluble so it can easily be washed off completely without you having a hard time.
That convince you? I sure hope so 🙂 Okay, now onto the recipe:
DIY Sugar Wax Recipe without Strips
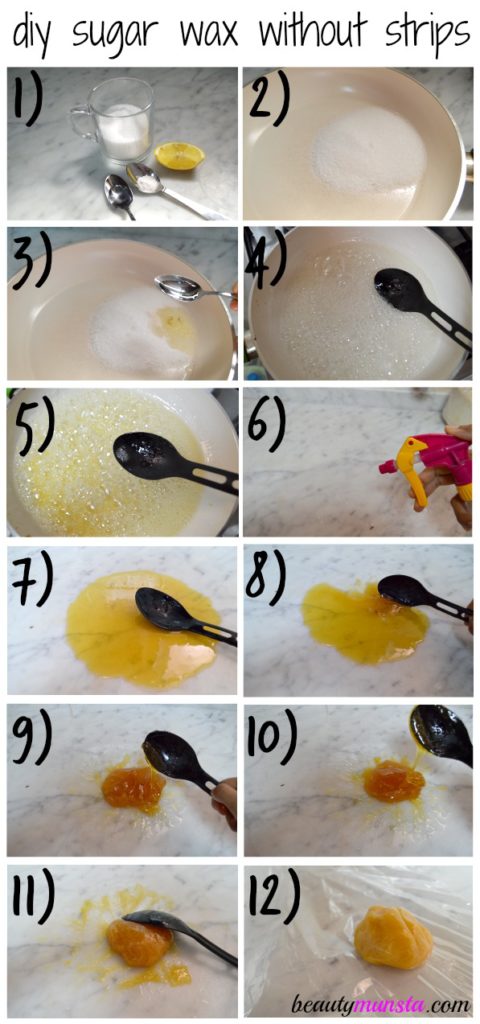
Ingredients
- 1 cup of white sugar
- 1/5 cup of water
- 1 tsp salt
- 2 tsp lemon juice
- ½ tsp guar gum (*optional)
Notes about the ingredients:
► Lemon juice – Some sugar wax recipes online say to use ¼ cup of lemon juice but for many people, this can be stinging and irritating on the skin so I chose to use just 2 tsp. Lemon juice is added mainly because it’s rich in citric acid that prevents the sugar from crystallizing and the mixture from becoming gritty. From what I’ve seen you can also use vinegar as a substitute, but seriously that will stink. Another substitute is corn syrup.
► White sugar – The regular white sugar is what I recommend since you’ll know when it turns that golden syrupy color we want. It’ll be difficult to see if it’s ready with brown sugar. But if you want, you can try using any sugar. Sugar is also an antibacterial that naturally preserves the sugar wax without it going bad.
► Guar gum – This ingredient is a thickener and an extra ingredient to make the sugar wax paste more pliable and elastic so you can pull and stretch it without it being hard.
Directions
- Add the sugar to a saucepan or non-stick pan like I did. Place the pan over a medium low flame.
- Next add the lemon juice, salt and water.
- Now start stirring so the sugar dissolves and everything mixes together. You will see it bubbling.
- Continue stirring and keeping an eye on the mixture. Watch it while it quickly turns into a golden syrup.
I can’t tell the exact time it takes to get to this color because it’s quick and that’s why this is the part people mess up so stay close and keep the flame on the burner stable. - Once it turns a golden color, immediately turn off the flame and vigorously stir in the guar gum.
- Then get a spray bottle filled with water and start squirting some water on the marble or granite kitchen counter or baking pan.
- Once you have a thin layer of water on the counter/baking pan, quickly pour the golden syrup onto the surface and using a spoon, start scraping the syrup from the edges going towards the center. This step is the initial stage that helps to form the ball of sugar wax while allowing it time to cool down and solidify.
- Now once you’ve formed a ball and it’s quite hot but enough that you can touch it without hurting yourself, wet your hands and scoop up the sugar wax ball and start pulling and stretching it while occasionally wetting your hands to allow the dough to become stretchy and pliable. This can take about 15 minutes.
- When you’ve got a soft elastic texture, it’s ready! Pull off a smaller piece of the sugar wax ball for use and wrap the bigger piece in plastic and store it in the refrigerator where it can last really long like up to 2 months.
*Check out this video from which I borrowed the measurements!
How to Use the Sugar Wax on your Body
 Note: Sugar waxing works on hair that is fairly short and even 1/8 inch long! If your hairs are long, then you can trim them to make things easier.
✾ First and foremost, make sure you prep your skin before you even begin to think of sugar waxing. Some people may find that they can’t seem to use the paste after long because it gets gooey but that’s because of inadequate exfoliation so this part is important. By prepping I mean take a hot shower and use a bit of a scrub on the areas you’re going to sugar wax. I like my DIY sugar scrub recipe with rosemary best!
✾ Once done showering, dry your skin thoroughly. Don’t sugar wax immediately after a shower because your skin needs to be thoroughly and completely dry and moisture stops the sugar from sticking well onto your hairs.
✾ After about 20 minutes, get corn starch or baby/talcum powder and dust it all over the area to be sugar waxed. This ensures that the sugar sticks to your hairs.
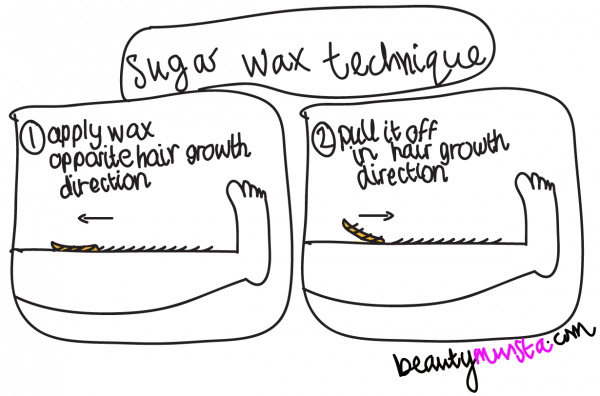
✾ Now get the sugar wax ball and stretch it over a small area of skin (say 2 to 3 inches – don’t do large areas like from knee to ankle – it won’t work!), pulling it the opposite direction of your hair growth. Let it sit for just about 7 seconds.
✾ Then quickly pull off the stretched wax in the direction of hair growth. Be alert: Not the same direction as you put it on your skin!
✾ That’s it! Do all areas and then moisturize with lotion/coconut oil/shea butter. Enjoy your smooth hairless skin!
My Tip
It helps to avoid applying lotion on the area you want to remove hairs from 24 hours before you sugar wax so your skin is dry, clean and non-slippery.
FAQs
✾ Will it really not hurt that much?
Yeah, it won’t hurt as much as waxing or epilating but of course, it’s going to hurt for a short time because you are essentially plucking out your hairs which triggers pain. If you’re doing sensitive areas like your armpit, it’s going to turn red as well as feel irritated especially if it’s your first time, but just keep rubbing the area with your fingers which will help alleviate the pain. Also, you should apply something soothing like coconut oil or body lotion after your sugar waxing session to cool and calm your skin.
✾ My sugar syrup turned out dark red. Is it still usable?
That’s what I got the first time I tried and unfortunately, it’s a complete fail – you have to trash it. This color means it’s burned because you didn’t watch it well enough or used high heat to cook it. It won’t work because it’s going to turn into some hard thingy when you try to bring it together to form a ball with a spoon.
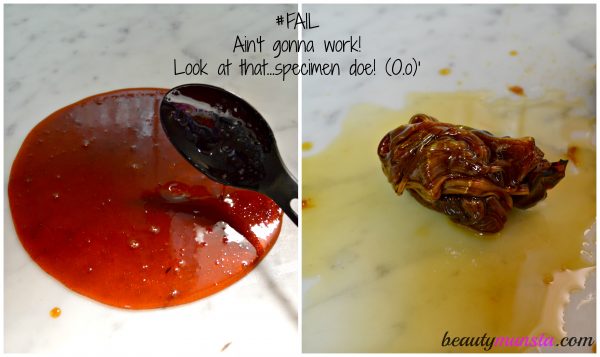
✾ My sugar wax is soft and liquidy. What do I do?
First off, don’t use it because it’ll kinda stick to your skin and you’ll find it hard to remove! Why is it soft? Because you haven’t cooked it enough. Remember you should cook it until it turns thick, syrupy and most definitely a yellowish golden color. You may try cooking it again until you achieve the desired consistency or toss it out.
✾ Oh no! I don’t know why but it’s not pulling the hairs off.
Make sure you’re allowing the wax to sit on your skin a bit before you pull off so that it actually sticks to your hair. Maybe you also didn’t exfoliate well? Remember the area you want to be hairless must be clean, excess oil-free and dead-cell free for the sugar to properly grip onto the hair. Don’t miss: Gram Flour for Hair Removal | 3 DIY Masks to Use
✾ Can I use the sugar wax ball more than once?
Yes! You can use it up to 4 times until it loses it’s ‘firmness’.
✾ Can I use this sugar wax recipe for facial hair removal?
Honestly, I’ve never tried it out and I don’t think I will. You’d rather use it for legs, armpits, arms and other bodily hairs but not your face. For the face, one trick I’ve tried out painlessly and successfully is using a paper towel and egg white. You can read more about it here.
When I Don’t Have Time to DIY, I Prefer To Use Moom Organic Sugar Wax – You Can Buy It Here:
Moom Organic Hair Removal with Tea Tree Refill Jar – 12 oz- Pack of 1
♥ Thanks for reading this mini sugar wax recipe without strips guide and hope you try it out! Got more questions? I’d be happy to help! ♥






one of the best well-explained and easy recipes.
Thank you Sakura!
So I followed your recipe after already having tried two others that didn’t work out for me. It went well up until the ”kneading” part where you form the ball. It had the same golden color but wouldn’t turn darker when scraping off the edges and once I grabbed it, it fell apart and turned into liquid again. Do you think I should’ve cooked it longer?
Hi StatusQuodium, yeah you definitely should have cooked it for a few more minutes. But don’t let it get darker because then you’ll have burned it. It really does take a couple of trial and errors and getting used to but once you get the right consistency, it is so much better than shaving! Hope it works out for you! You should check out the video link I included in the post if you have time! xoxo
It was going really well until I started kneeling it. It went elastic for the first time! And I was so excited because I’ve tried a couple of times… but I kneeded it a little more, and it turned dark and liquids again… ?
What happened? Do I need to stop kneeling once it becomes elastic?
Oh no! Yes, try stopping the kneading and see how it goes..Did you check out the video link I shared in the post? That can give you a good visual of how to do it. Wish you the best 🙂
Wow!! Its really worked for me.. I strictly followed all your instructions, this helped a lot.. Thanku so much ?
You’re welcome! 😀
do we have to use that brand of Guar Gum or can we use another brand?
Hi Sam, you can use any brand 🙂
Accidentally ordered xanthan gum, will it still work or would you recommend just returning it and getting actual guar gum?
Hey Sam,
It’s totally fine to use xanthan gum in your sugar wax! It’s similar to guar gum so it’s going to come out fine 🙂
I haven’t tried the recipe with xantham gum, so I’m not sure if it would work…Did you end up using it, and how did it work out for you?
nice recipe
AM I the only one who got confused when the salt was never mentioned ever again?
No I’m still trying to figure out when to put it in. Oh well.
Add the salt with the sugar, thats what I do and it works perfectly.
maliakalila (:
Salt is mentioned in step 2, “Next add lemon juice, salt and water.”
So I didn’t have any lemon juice when I did this but I did have vinegar so that’s what I used. But I did manage to make it smell good by adding just a few drops of lavender essential oil. Worked wonders!!
I followed your recipe and it took off the hair but my hair grew back in three days. I have stubble but I’d say its softer than it would be if I had shaved. I got a few bumps but I exfoliated to prevent more. My hair on my arms were long I’d say about 1/4-1/2 inches. I have done this about four times (My recipes failed the first 2 times). The last two were perfect but my hair grew back very fast, within two to three days. What do you think is going on?
Wow looks like your hair has a really fast growing rate! Most people who use sugar wax find that their hair takes a longer time to grow back compared to shaving. I suggest continuing the sugar wax consistently for 3 – 6 months, your hair will definitely start growing back slower and also become sparser, like mine did.
Hello! This sugar waxing is all I needed ASAP. I didn’t do it yet but I was wondering if it can be used also for facial hair (the area between lips and nose).
So I tried this 4 times, it looked so easy but… the first time it was too liquidate, the second time it was too hard, the third time also too hard and I burned my fingers, the fourth time it was too sticky 😢