I recently shared a sugar wax recipe without strips and you guys loved it but some of you were looking for a sugar wax recipe no lemon juice involved.
I was really unsure how that was going to work out since lemon juice is a key ingredient used to bind the rest of the ingredients and keep the sugar from crystallizing.
After much research and trial, I found out that a sugar wax recipe with no lemon involved was possible!
All you have to do is substitute the lemon for vinegar.
I know what you’re thinking right now, ‘Ew, there’s no way I’m going to use stinky vinegar!’ but no worries, friends, I have an aromatic solution for that: lavender oil!
Just add a few drops of that and your sugar wax will smell beautiful!
Why Some People Prefer Sugar Wax without Lemon
Here are a few reasons some prefer using a sugar wax without lemon:
► Sensitive skin. People with sensitive skin have harsh reactions to lemon when it’s applied to skin.
► Lemon can be very irritating to even normal skin. If you’ve ever used a lemon face mask before, you’ll know that lemon can sting and turn your skin red, unless you mix it with something soothing like honey or yogurt.
► You don’t have lemons/lemon juice in your house. Imagine a scenario where you don’t want to shave but you want to get rid of leg hairs so you search online for a sugar wax recipe which says to use lemon juice. You run to the fridge excited only to discover you’re out of lemons! What do you do? Use a substitute of course!
Unlike shaving, waxing eliminates the risk of ingrown hair.
If you suffer from ingrown hair, check out: DIY Sugar Scrub for Ingrown Hair Prevention & Treatment, DIY Ingrown Hair Serum Recipe and Don’t Pluck! Top 5 Essential Oils for Ingrown Hairs.
Now let’s get on with the sugar wax recipe without lemon:
DIY Sugar Wax Recipe No Lemon Involved
Note: This sugar wax recipe doesn’t use lemons and strips! The wax itself is used as the strip. Is that amazing or what?! Read: DIY Sugar Wax Recipe without Strips
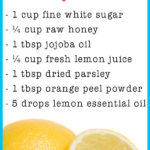
Ingredients
- 1 cup white sugar
- 1/5 cup water
- ½ tsp salt
- 2 tsp vinegar (white vinegar or apple cider vinegar – any can work)
- 3 drops of lavender essential oil (*optional – for good scent)
Directions
1. Place a non-stick pan on the stove-top and add white sugar, salt, water and vinegar.
2. Heat the pan over a medium-low flame and get a wooden stick and start stirring the ingredients so they all combine to form a thick mixture.
3. Using a spray bottle, squirt water onto your a baking pan. You don’t need to flood the baking pan – just squirt until you get a thin layer of water. Note: Instead of a baking pan, I used my marble kitchen counter top. However, some readers are saying it was a mess and they don’t know how to remove the hardened wax off! To avoid this, please just use a baking tray or pan.
4. Now keep a very close eye on the mixture as it boils and bubbles away. Keep stirring it as it thickens. It will take about 5 minutes. You can even turn the heat on low so the mixture doesn’t burn.
5. Once your mixture has turned a golden color, turn off the stove and immediately pour it on top of the water you squirted on the kitchen counter. If you are using lavender essential oil, I suggest mixing it in quickly right after you turn off the burner and take it off the stove.
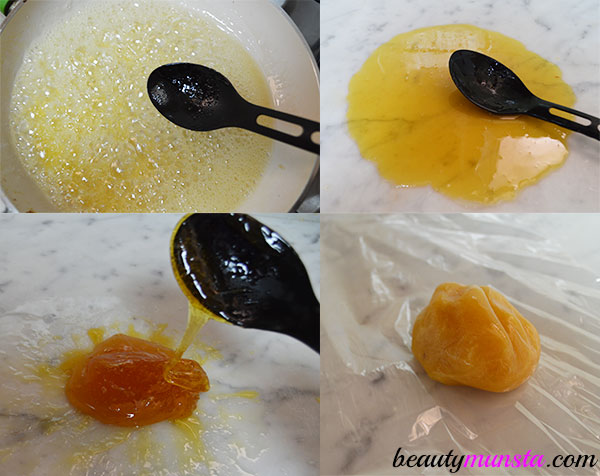
3. Using a spoon, start pushing the golden syrup from the edges inwards to the center to form a ball. You should do this step quickly since the syrup will rapidly start hardening.
4. Once you’ve got the ball formed, wet your hands and gently pick it up (make sure it’s not so hot that it can burn). Start pulling and stretching the sugar wax ball while wetting your hands for more grip.
5. Keep stretching and pulling it to make it soft and pliable. This can take about 15 minutes.
6. When the sugar wax is soft and pliable, pull off a smaller piece from the big sugar wax ball and keep it for use. Wrap the big sugar wax ball in cling film and store it in the refrigerator for up to 2 months.
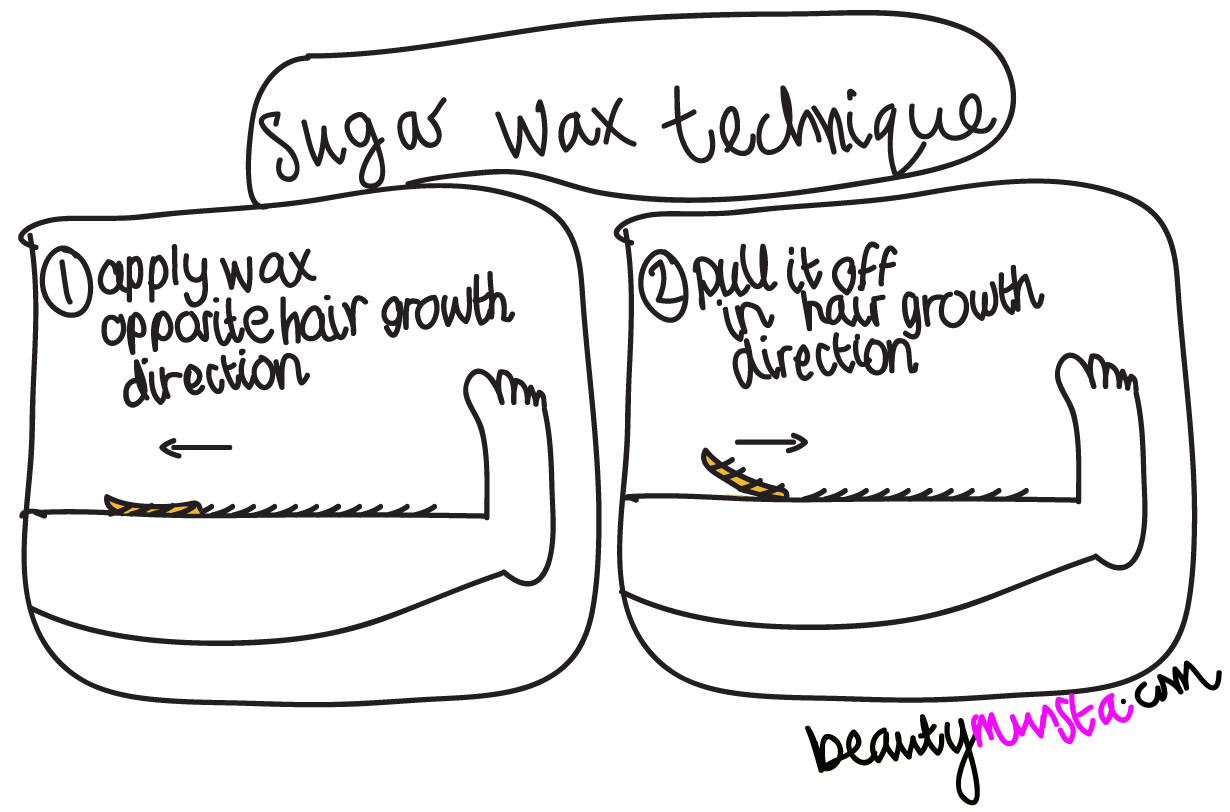
Sugar Wax Hair Removal Technique
All you have to do is stretch the wax flat on about 2 inches of your skin, away from the direction of hair growth. Let it sit for 3 seconds, then quickly pull it off in the direction of hair growth.
Don’t forget: apply it away from the direction of hair growth, pull it off in the direction of hair growth.
Basic Sugar Waxing Tips
► Please Exfoliate. If you want sugar waxing to work for you, then by all means, exfoliate your skin first. Use a good sugar scrub to gently slough off dead cells, grime and other impurities from your skin. You can easily make your own exfoliating sugar scrub at home by combining ½ cup of sugar and ¼ cup of oil of choice. Check out my delightful Rosemary Sugar Scrub Recipe if you’re looking for a DIY exfoliating scrub!
► Hot Shower. Take a hot shower or bath to open the hair follicles and soften skin.
► Don’t Immediately Sugar Wax After a Shower. Much as I said exfoliate your skin right before sugar waxing and I know almost all of us exfoliate in the shower, don’t sugar wax immediately after your shower without properly drying your skin. There shouldn’t be any moisture on your skin. Your skin should be completely dry for the wax to hold on to the hairs.
► For Perfect Hair Removal. You can even dust baby/talcum powder or plain corn starch all over the areas you’re going to wax, wait for maybe an hour then sugar wax. The powder will help the sugar wax grip onto your hairs easier.
Your Sugar Wax Questions Answered
→ Which Vinegar Should I Use?
You can use either white vinegar or apple cider vinegar, whichever is more readily available to you.
→ Can I Use Brown Sugar?
I suggest sticking with regular white sugar. You can use raw sugar or brown sugar but it’s a bit tricky to gauge whether the wax is ready or if it’s burned because for white sugar, you can quickly tell its burned by the color but brown sugar, the mixture will be brown from the beginning and you can only tell it’s burned by the smell so I guess you’ll have to keep your nostrils open more than your eyes (lol).
→ How Many Times Can I Use the Sugar Wax Ball?
Up to four times before it loses its pliability.
→ What Should I Apply after Waxing?
After a wax, soothe your skin by applying aloe vera gel on it. Check out: 3 DIY Aloe Vera Gel Recipes for Skin
When I Don’t Have Time to DIY, I Prefer To Use Moom Organic Sugar Wax – You Can Buy It Here:
Moom Organic Hair Removal with Tea Tree Refill Jar – 12 oz- Pack of 1


Can’t get it to stick together :/
I tried this recipe, and it just went ashy and white…?
im ded
Me to
Me three
Terrible result! Just turned hard like candy and made a hard sticky mess of my counter.
Oh no! I got a dark brown rock hard candy the first time too! It definitely does take a few tries (like 2-3 times) to get it right. So work with small batches first and don’t lose hope! Good luck!
Same here, thank god I used a baking tray, I could dissolve the hardened sugar with boiling water
oh my goodness! this literally didn’t work for me and it all stuck to the pan! i’m so glad that i saw your comment or my mom would have killed me for ruining her tray! and the water thing worked!
This didn’t work at all it went brown and gooey and I left it to dry got a ball of sugar out and as soon I put it on my skin it went hard and didn’t stick at all
So, I got to step three of pictures but when I was kneading it it went soupy again
Hi Rara, I’m sorry this happened! But if you notice, in step 2, the wax is syrupy and not soupy. If it’s soupy then you haven’t cooked it long enough. It should turn into a sugar syrup for it to gather up nicely into a ball.
With mine at first it was too runny but sticky when kneading it but I think I may have had too much water on the counter. So I put it back in the pan and cooked it longer, I only had a little bit left so was determined for it to work.
Left it cook for another three minutes and then poured it on the counter and let it cool down for nearly 5 minutes and then I kneaded it into a ball and took a bit off and it was perfect! Couldn’t believe it but after a few minutes it became too sticky and was useless!
Not sure if that’s meant to happen but I think it was a good first try! Got some leftover in the fridge!
Thanks 🙂
It worked and all, but how do I get the leftover stuff off of my counter?
Do you have a tip How to clean the counter sfter the sticky mess?
That didn’t work at all. Totally crystallized.
Where do I use the salt!!!!!!! I tried and it was a mess?? I’m trying again but I’m lossing hope!!
Can you heat it up using the microwave?
I’m actually allergic to lemons and a bunch of other things so this is something that I will probably try tomorrow. Thank you!
It didn’t thicken at all and remained a whitish clear liquid the whole time
Is this a fast method? I have a short time schedule to get ready for school in the morning and thought i’d try this to get some hair off my upper lip… I have about an hour to get ready but my mornings are really rushed… Is this method recommended? We have no lemons or lemon juice… That’s why I needed this method. If it’s too messy and time taking and doesn’t work, please let me know!!
Not Good!
By the time it’s cool enough to handle its way too hard to knead, I tried once and threw it out because of this reason. I tried for a second time and used wooden skewers to start kneeling before it was cool enough to touch and the same thing happened.
so apparently salt is an ingredient, but you didn’t mention it during any of the steps?… Wtf?
Big question how do you clean it up off of the counter
Used this recipe and was just frothy and white. Turned the heat up and it turned to a golden color but not burned. Could NOT form it into a ball. Absolutely ruined my countertop. Was not pliable AT ALL. This is definitely the worst mistake I’ve ever made
this was absolutely horrible. i was mixing the ingredients but the sugar just dissolved and it turned into a liquid substance, i wasted sugar on this. i did everything right, but it didn’t even feel the slightest bit of thick.
Where does the salt come in?
This is HORRIBLE. I followed all of the instructions that were given, and now this stuff is stuck to my counter, I can not get it off. DO NOT TRY THIS RECIPE!!!
Great post! I just wanna know if you want to reuse it, do you have to reheat it first? If yes, how?
Some tips: use a silicone spatula or spoon. As the sugar wax cools you can peel it off this utensil easily.
If you have a silicone tray, use that to pour the wax out of the pan. Another option is parchment paper- once you have it in a ball, it peels super easily off the parchment.
As far as sugar waxing as a whole- I think I ever so slightly overcooked the sugar- if I reheat the wax, it only pulls hair at the point where the sugar is almost too hot for my skin, and only pulls hair for a few seconds- no reusing the strip. Maybe my hair was too long. I’ll look up videos for the ideal consistency and try again