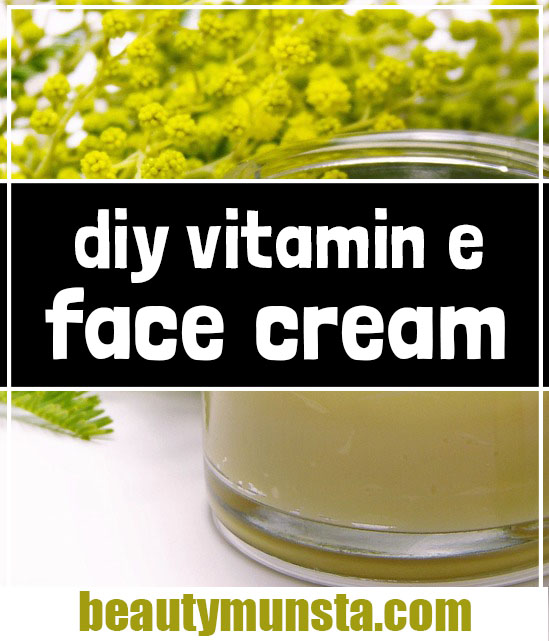
Welcome to our guide on how to make vitamin E face cream with all natural ingredients!
Vitamin E is an essential ingredient for skin health.
The body usually releases vitamin E to the skin naturally within sebum.
The amount of vitamin E in your sebum can be increased by taking more green vegetables and other vitamin E containing foods.
While taking food rich in vitamin E can be a solution in ensuring that your skin gets these nutrients via the blood stream, using vitamin E creams is sometimes a better option.
Know as the “Skin Protector”, Vitamin E is a skin-conditioning and a natural hair health ingredient.
Its antioxidant characteristic provides lustre to dry skin and hair.
Of course, let’s not forget that Vitamin E reverses premature aging, reduces wrinkles and fine lines and makes the skin supple & youthful!
Why Make DIY Vitamin E Face Cream?
You’ll find many face creams on the market containing Vitamin E. But none of them will be dedicated vitamin E creams.
They’ll just have a small percentage of vitamin e them. But when you make your own, you can add the maximum amount of vitamin E for dedicated skin healing.
Even if you do find a specialized vitamin e cream, you’ll find it to be way too expensive.
Making your own at home is cheaper.
Besides, you’ll be able to avoid the numerous additives, preservatives and synthetics that are added to commercial products to keep them on the shelf for years.
What Are The Benefits Of Using A Vitamin E Face Cream?
Some of the benefits from the use of vitamin E face cream include;
1. Sun damage protection:
Protection from sunlight damage is one of the critical needs of your skin Ultra-violet rays are harmful to your skin, so please use vitamin E which can guard against UV damage. Vitamin E face creams can act as sun screens, too.
2. Prevention of wrinkles:
Premature wrinkles appear mostly due to damaging radicals in the atmosphere. These radicals reduce vitamin E levels on your skin which then lead to wrinkles. When you use your vitamin e face cream regularly, it will moisturize your skin, reducing the depth of wrinkles that exist on the face.
3. Treats sunburn, acne, pimples, cuts and scars:
Vitamin E contains incredible healing power on the skin. It helps with faster cell regeneration, healing wounds faster and preventing the formation of ugly scars. To relieve rashes and sunburns, put the cream in a fridge for a cooling effect of the skin.
4. Prevents ingrown hairs:
Razor burns may lead to irritation but with a vitamin e cream you can reduce the irritation and avoid ingrown hairs too. This is helpful for women who shave their face as well as for other areas including the underarms and legs. Vitamin E is highly anti-inflammatory and provides relief to the skin, plus reduces redness on the shaved areas.
How To Make Vitamin E Face Cream
The face cream will best work when used at night time. But you can useit at any point of the day to moisturize your dry skin. We will only use natural ingredients that are easily accessible.
Here’s our quick guide on how to make vitamin E face cream at home:
Ingredients:
- Three tablespoons of Shea butter
- Four tablespoons of coconut oil
- One tablespoon of Vitamin E oil
- Eight drops of your favorite essential oil such as the lavender essential oil
- Double boiler
- Hand mixer
- Air tight storage container
Procedure:
- Melt the shea butter and the coconut oil together while using a double boiler until they both melt together.
- Once fully melted, let it cool for a little while by removing it from the boiler.
- Combine the vitamin E oil obtained from the vitamin capsules together with the essential oil chosen to be used, such as the lavender essential oil.
- Put this mixture in a bowl and then put it into a refrigerator for about half an hour by covering the bowl with a plastic wrap to avoid any contamination to the mixture from the fridge.
- Pick the mixture out the refrigerator and stir the mixture vigorously which might be done by whisking with a hand mixer till the mixture is fluffy.
- Transfer the result to a clean bottle or jar.
- The cream is ready to be used for your face.
How To Use Your Vitamin E Face Cream
To use the Vitamin E face cream, follow the below procedure on its usage to get the best results from this cream:
- The cream will work the best overnight. Therefore, it is necessary to apply the cream on your face as before bed on a daily basis.
- In the application of the cream, focus on the wrinkle-prone areas which include; mouth, eyes, and neck. This will always make your face look supple and youthful. Also give extra attention to areas with blemishes, dark spots or scars.
- Massage your face with the cream until the cream is completely absorbed in the skin.
- Use small amounts of the cream to avoid excess coating.
- You can repeat the procedure up to three (3) times a day for the best results.
- Ensure that the cream is applied on a daily basis.
Hope you learned how to make vitamin e face cream at home! Do try and tell us how it worked for you!


Hi.
Love your face cream recipe. But in the ingredients you have shea butter but in the instructions you have cocoa butter. which is the correct one?
Hi Effie,
Thanks for letting me know – that was a typo. It’s shea butter! <3