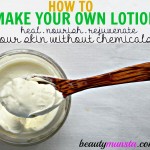
Shea Butter and Coconut Oil Mix for Skin
If you’re looking for a moisturizing and nourishing but at the same time not-so-greasy shea butter and coconut oil mix for skin, then I’ve got a recipe that I hope you’ll love! As you can tell from the title, shea butter and coconut oil are the star ingredients in this mix but I’ll be using my favorite carrier oils, essential oils & other skin nourishing goodies as well.
How to Make a Shea Butter and Coconut Oil Mix for Skin
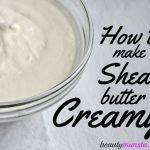
This shea butter and coconut oil mix can be used as a lotion, body butter or moisturizer because of its smooth whipped cream like consistency. You will need a hand mixer or egg beater to whip the ingredients to a crème. Let’s move on to the ingredients:
Ingredients
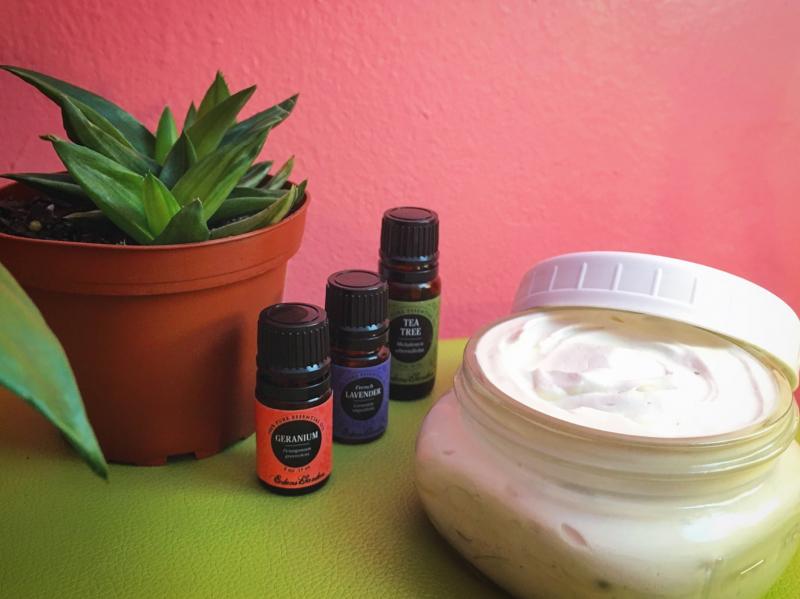
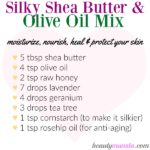
• ½ cup of raw shea butter (get it here)
• ¼ cup of organic coconut oil (get it here)
• ¼ cup of grapeseed oil (get it here)
• 1 tbsp of raw honey *optional* (get it here)
• 5 drops of geranium essential oil (get it here)
• 5 drops of tea tree essential oil (get it here)
• 5 drops of lavender essential oil (get it here)
Benefits of the Ingredients
Before we move onto the recipe, I first want to talk about the benefits of each of these ingredients for skin:
1. Coconut Oil – Coconut oil is a champion when it comes to DIY natural skin care recipes – and with good reason too! It has lots of beauty benefits including treating acne, delaying premature aging, moisturizing skin, protecting skin from germs and so much more! Plus organic coconut oil is non comedogenic, which means it won’t clog your pores at all. Read more beauty benefits of coconut oil here.
2. Grapeseed Oil – I love using grapeseed oil because it is a very light oil and will not add more oiliness to this shea butter mix. It will enhance the moisturizing properties of the shea butter and coconut oil as well as help treat acne, firm & tone the skin, fight aging and much more!
3. Raw Honey – The raw honey is totally optional in this shea butter mix but I’m someone who loves adding raw honey to my body butter because its jam-packed with anti oxidants, vitamins and minerals that are so good for the skin! Raw honey will also moisturize your skin, help fade away any acne scars, dark marks and other discolorations as well as keep skin soft and supple.
4. Geranium Essential Oil –Geranium essential oil is one of my favorite essential oils and it smells so wonderful. It also has lots of beauty benefits for skin including: nourishing skin, healing inflammation, treating acne, lightening scars and blemishes, etc.
5. Tea Tree Essential Oil –Being a natural antiseptic, antibacterial, anti-inflammatory, antioxidant and astringent, tea tree essential oil is a powerful essential oil for healthy skin. It is commonly used to fight acne but can also be used to regulate oily skin, soothe skin inflammation, treat ingrown hair and more. Tea tree essential oil can also help soothe and calm razor burns, making it a perfect ingredient in this shea body butter mix. More benefits of tea tree essential oil here!
6. Lavender Essential Oil – Lavender essential oil is one of the most popularly used household essential oil that also offers lots of benefits for the skin as well. It helps heal dry and chapped skin, provides soothing sun burn relief, detoxifies the skin, acts as a natural perfume, treats acne, delays wrinkles and alleviates skin infections and inflammatory conditions, among others. Wanna know more about lavender EO? Go to this post!
Directions
1. Place the shea butter and coconut oil in a double boiler over low heat and wait for the mixture to melt completely.

2. When melted, leave it to cool down slightly before stirring in the grapeseed oil, raw honey and the essential oils.
3. Pop it in the refrigerator for about 10 minutes.
4. When the time is up, get out the bowl and whip it to a silky consistency using a hand mixer. This usually takes about 10 to 15 minutes.
5. Wohoo! Your homemade shea butter and coconut oil mix is ready to be slathered all over your body! The final mixture should be white in color and having a whipped cream like consistency. PS: It smells oh-so-AMAZING.
6. Transfer into a clean jar and store it in a clean dark place. It will keep for a very long while, about 6 months or more.
How to Apply this Shea Butter and Coconut Oil Mix
If you don’t use this shea butter mix the right way, you might end up with an oily looking face! Here’s my trick on how to apply the shea butter mix so your skin doesn’t look greasy:
Apply this shea butter and coconut oil mix on fresh after-the-shower skin for an uplifting and amazing day ahead! Using clean fingers, scoop out a tiny pea sized amount of the mix and rub it between your fingertips. Apply to your face and neck. Yes, only a pea-sized amount is enough for your face and neck. More than that can make your skin look greasy. For the body, you only need a dollop of the mixture. The best part about this shea butter and coconut oil mix is that it readily gets absorbed into your skin without clogging pores!
My Tips
- You have to whip the melted mixture when it has cooled down completely and isn’t fully melted. That’s the reason we’re popping it in the refrigerator for a while. Another alternative is to beat the mixture over a large glass bowl packed with ice cubes.
- Please use only organic ingredients to make this shea butter and coconut oil mix so that it’ll have a long shelf life. If you use low quality ingredients, the mix is likely to spoil after a short while.
- Your essential oils must be 100% pure and of high quality.


Thank you for this body butter recipe, it smells & feels incredible, I love it! The first batch I made included raw manuka honey, but I found that it made the recipe really sticky when applied to completely dry skin & left a bit of residue. The stickiness went away once it was fully dried but it was unpleasant enough that I decided to skip the honey when I made my second batch. Now there is no more sticky residue! I’m wondering though if anyone had similar results with the honey… I just added it ‘as is’ to the already cooled shea/oil mixture, do you think melting the honey with the shea would’ve made a difference in the texture?
Thank you for this body butter recipe, it smells & feels incredible, I love it! The first batch I made included raw manuka honey, but I found that it made the recipe really sticky when applied to completely dry skin & left a bit of residue. The stickiness went away once it was fully dried but it was unpleasant enough that I decided to skip the honey when I made my second batch. Now there is no more sticky residue! I’m wondering though if anyone had similar results with the honey… I love the idea of using honey in skincare but I couldn’t deal with the sticky feel. I just added it ‘as is’ to the already cooled shea/oil mixture, do you think melting the honey with the shea would’ve made a difference in the texture?
Anyways, I can’t wait to make more using other essential oils. I think I’m going to try a blend with frankincense next!
*repost: accidentally deleted original comment
Hi Momo! Oh wow! Thanks for the picture! It looks so heavenly and luxurious! Hmm…I’ve had no problems with the honey at all. I’ve blended honey, shea and rose water alone in a small blender before and even then it wasn’t sticky one bit. Maybe you should reduce the amount to only 1 tsp? Yes, you can also try melting it together with the shea but don’t heat it for long as heat will destroy the nutrients in the honey. I’m so happy that you loved the recipe and hope your blend with frankincense comes out as amazing! 😀 Take care!
all sounds so good… but im wondering if it could work in the tattoo industry as an ointment during work? there is very similar product bestseller right now on the market, but i dont wanna for overpriced products because obviously i can do it myself.thank you
Where can I get these oils?
You can get them at organic stores, Walmart or order online on Amazon. You could also check out the pharmacy 🙂
Hi,
Can I add high quality cented oil?