
The first time I found that you can make your own apple cider vinegar from scratch, I was super excited – but the source I read it from said it will take about half a year to a whole year till it’s fully ready and that was a major let down for me! I was disheartened and abandoned the idea until a few months ago when I found out from someone else who’d tried it that it needn’t take that long! I immediately followed the instructions and had my chopped apples and sugar water in a glass jar in no time!
The people who do make their own apple cider vinegar usually use a starter or ‘the mother’ by simply using a few tbsp of already made raw apple cider vinegar in filtered water but in this post, I’ll show you how to make your own apple cider vinegar from scratch! All you need is apples, water and a sugar or natural sweetener of choice!
Why you Should Make Your Own Apple Cider Vinegar from Scratch
Here are 3 simple reasons you should try making your own apple cider vinegar at home and from scratch:
► It’s super easy! Making your own apple cider vinegar is no complex task. As I said before, all you need is 3 ingredients: apples, filtered water and a natural sweetener. Mix in the sweetener with warm water, add in the chopped apples and let the mixture ferment for a few months.
► It’s healthy! Apple cider vinegar is a SUPERFOOD. It’s brimming with powerful antioxidants, nourishing nutrients and good bacteria that support a healthy gut, skin, hair and general body. Other benefits of raw apple cider vinegar are: treats heartburn, improves digestion, soothes itchy skin, heals sunburn, clears sinuses, aids in weight loss, gets rid of warts, prevents diabetes, heals sore throat and so much more.
► It’s cheap! Chances are that you already have all the ingredients needed to make your own apple cider vinegar in your kitchen right now. Seriously, grab some apples from your fruit basket/refrigerator, sugar from the cupboard and water from your filter and you’re ready to make a powerful superfood for good health!
Ingredients
- 3 organic apples
- 3 tsp natural sweetener of choice (like liquid honey or coconut sugar)
- 3 cups filtered water
Directions
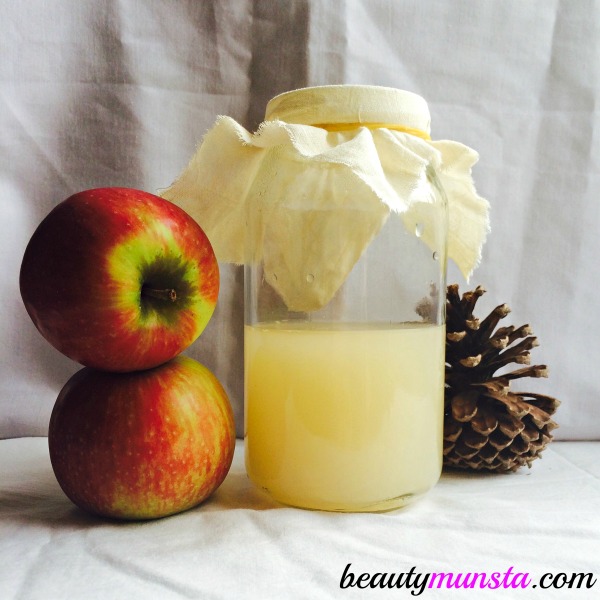
- First start by sterilizing the glass jar you’re going to be storing your apple cider vinegar in. I just boiled tap water, poured it into the glass jar and let it sit for 3-5 minutes then threw it out.
- Next, thoroughly wash 3 apples with warm water and soap. Then roughly chop them up into large cubes, discarding the seeds.
- Now heat 3 cups of filtered water until warm then stir in 3 tsp of natural sweetener. I used raw palm sugar syrup. Finally, add the chopped apples and then cover the glass jar with a clean cloth and secure with a rubber band.
- That’s it! Now keep this glass jar somewhere clean and warm like the pantry or if you’re forgetful, on top of your refrigerator (where I kept mine!)
- Let it sit undisturbed for 2 weeks. After two weeks, check your apple cider vinegar – there will be some tiny bubbles and the top of some of the apple pieces might have gone bad so discard these pieces and keep the glass jar back.
- After another 2 weeks, check the glass jar again – you will find a white film at the bottom and/top of the glass jar and that’s the ‘mother’ or good bacteria that you will use to start your next batch! Filter the apple cider vinegar into another sterilized glass jar and discard the apple pieces. It’s not ready yet! If you taste it, it will still have a sweet taste which should have disappeared as the good bacteria feeds on sugar and completely breaks it down. So wait for about 4-6 weeks for your apple cider vinegar to ferment and get ready.

After 4 weeks. Notice the little bubbles on top and the white film at the top & bottom of the jar! That’s supposed to form the ‘mother’. - When the time is up, your apple cider vinegar is ready! Apple cider vinegar is very powerful and will thoroughly cleanse your system, boost immunity and promote overall good health. Start drinking a cleansing morning detox tonic by mixing 1 tsp of your own apple cider vinegar, 2 tsp of organic wildflower honey and 1 tsp lemon juice in 1 cup of warm water every morning! PS: I’ve started adding 3 drops of black cumin seed oil to my ACV detox drink to make it a more powerful cleansing and antioxidant tonic!
- Go right ahead and make your next batch so when this one is done, you can have the other one ready! To make another batch, follow the steps above but this time, add 2 tbsp of the first ACV batch to act as the ‘starter’ for the next ACV.
My Tips
- When you add the sweetened water to the chopped apples in the glass jar, you’ll notice that the apple pieces will immediately float up and some of the tops will be exposed to air. I was worried about this but I didn’t need to. After a couple of weeks, they will start sinking and you can throw out the top pieces that might have gone bad.
- Don’t have a natural sweetener? It’s okay! You can still use plain old white sugar – it won’t make your apple cider vinegar unhealthy since the bacteria present will feed on the sugars and completely break them down by the time your apple cider vinegar is ready!
- I made a small batch with just 3 apples as you can see but you can make a bigger batch with as many apples as you want, provided you’ve got a large glass jar to store it in!
Enjoy the full benefits of raw apple cider vinegar for good health!
How does it Taste?
I’m not gonna lie – it tastes and stinks like smelly socks when mixed in water. If you’ve ever bought raw apple cider vinegar then you know what I mean! However, the morning detox tonic recipe I shared above helps make it drinkable! Enjoy, my friends! ;0)
Got any questions? Please ask away in the comments below and I’ll be happy to help 🙂
Beauty Benefits of Apple Cider Vinegar
From healing acne to promoting lustrous hair, discover 20 amazing beauty benefits of apple cider vinegar!


Leave a Reply